Friday, June 1, 2018

More Cross Compiling for MIPS32

So in previous posts I could not successfully pull off building my own toolchain to cross compile on MIPS32.

I decided to try and do a simple cross compile using the OpenWRT toolchain.

Let me review the steps for this:

  1. Download OpenWRT by doing a git clone on the OpenWRT project
  2. Select your target architecture using the "make menuconfig" command at the top directory of the OpenWRT project
  3. Invoke the build and monitor results to ensure build compiled correctly
The complexity of OpenWRT, and reverse-engineering what it is doing, starts here.

Here is the output directory structure...
....or at least what is written out to MY system when I did the build). 

As you can see, I decided to name my configuration with a name that corresponded to the OEM router I used to build the image (handy if you install OpenWRT on multiple OEM routers).

So let's start talking now about why this is confusing.

1. You might expect the toolchain to be in the toolchain directory. 

And it is, but it's not. The stuff to build the toolchain is in the toolchain folder....
.
...but the output of the build is not in this directory.

It is probably in the build_dir folder then, right? WRONG.


The build_dir folder is where the build is kicked off from. But once that happens, everything is written out to the staging_dir

So let's go and take a look at that directory.


There are a few directories listed, so we will do some investigation and hunt for some binaries. A quick find command shows that indeed, there are some bin directories we can look at.

It turns out that the top level bin directory has the generated executables. 

So when OpenWRT builds the toolchain, it writes it into the staging directory for the specific target that was configured in the initial "make menuconfig".

So the next step then, is to make sure that these can be used to build some code on the target device (MIPS32 in our case).


A simple testcompiler.c file is all that is needed:
#include <stdio.h>

int main()
{
   printf("Testing MIPS32 Compiler!\n");
}

Next we will set up a simple Makefile to compile this simple source (we could do it on command line of course also).

all: testcompiler.o

testcompiler.o : testcompiler.c
      ${CC} testcompiler.c -o testcompiler -static -march=mips32

Next, we need to ensure that the proper compiler gets used, and we can do this by using an environment file before we kick off the build with the "make" command.


Now there are a couple of ways to test this binary, but the first and most simple thing to do is to inspect it using the file command, which indeed will confirm whether the binary was built for MIPS32.


Good. It is. So we can now do one of two things: 
  1. Copy it to the target and run it
  2. Run the binary through an emulator
Emulators can be tricky to install and set up. The one most commonly used for Linux x86_64 architectures is QEMU. 

NOTE: I tried to install and use this but got a bunch of errors. So, using QEMU was not as simple as I thought it would be. Something for later. 

So, I copied it over to the target and it ran just fine.

Now this process is as simple as it gets. When you get into dependent libraries and packages, building, as well as running, on cross compiled architectures can get quite a bit trickier.

And I do plan to do some more sophisticated cross compiling, so I will write more on that as I do that.

OpenWRT Router (re) Configuration

I had to do some testing today, and I needed two routers to do that testing.

So I decided to use a Ubiquiti EdgeRouterX (MIPS32) for one of the routers, and for the other router I used the same <former> Ubiquiti EdgeRouterX (MIPS32), which I re-imaged with OpenWRT (discussed in previous posts).

Both of these routers enable an L3 switch across all of the ports, by default.  And what this means, is that by default, if you plug into any of the ports on the device (except the WAN port of course), you will be on the same default LAN segment.

The Ubiquiti router is a little bit "smarter" in how it is defaulted, and it also has a Wizard that allows you to select how you want your ports set up, at which it will automagically configure the device ports settings for you. You can, for example, select 2 WAN ports (a very advanced link aggregation feature for a router like this), or just a single WAN port (more typical use case).  But what this router does, is allow one port (eth0) to be the "admin" port which is on a LAN called 192.168.1.0/24, the WAN port is eth0 (dhcp by default), and the ports eth2, eth3 and eth4 are all on a switch with a LAN numbered 192.168.2.0/24 (or whatever you want it to be, frankly).

The OpenWRT router behaves differently upon default install. It does not have this concept of a dedicated "admin" port on eth0. It assumes (like most routers probably) that eth0 is the WAN port (dhcp by default), and eth1-eth4 are on a L3 switched 192.168.1.0/24 VLAN.

The <potential> issue here, if you use both of these routers together, is that the Ubiquiti knows inherently how to route to that 192.168.1.0/24 admin network that it has set up. So if you pull a 192.168.2.10/24 address via dhcp from the Ubiquiti, and put https://192.168.1.1 in your browser, voila' you get the admin page of the Ubiquiti router (btw....this is also accessible via https://192.168.2.1).

So you have two routers that understand a 192.168.1.0/24 local, separate address space. That's a problem.

I needed to change the OpenWRT router, so that it's address spaces were different than the Ubiquiti router. I thought this would be easy and take 15 seconds, as it does on the Ubiquiti. It was NOT as intuitive. Furthermore, I was very concerned about bricking the router (screw it up such that I could not connect to it or administer it), since I had put OpenWRT on it and wasn't sure what would happen if I paperclip reset it. So I had to be careful, which added even more time.

I managed to pull this off. And in fact, I *did* screw this router up in the process, but was able to reset it with a paperclip, which put the original OpenWRT default configuration back on it (thank goodness).

So here are the steps to create a new subnet on a set of ports:

1. Create a new device

By default, there is a WAN, a WAN6, and a LAN.

NOTE: The WAN6 is confusing and a separate topic to discuss. I deleted this WAN6 thinking it was redundant, and this is probably one of the reasons I had to reset the router.

I created a new LAN2 interface as a first step.


Now you can do this manually, if you want to play with fire, and ssh into the device and edit the file /etc/config/network. The setting for that in the file would look like this:

config interface 'lan2'
        option type 'bridge'
        option proto 'static'
        option ifname 'eth0.3'
        option ipaddr '192.168.3.1'
        option netmask '255.255.255.0'

But if you edit these files "hot" while the device is running and happen to make any kind of typo or syntax error, and you might find yourself with some big problems and unable to log into the device.
So I decided to use the GUI, because would assume a GUI knows how to save things properly (if not this router is in some big trouble).

If you click on "Edit", you will see some of the fields that I had to examine, and some of which I had to fill out to make sure this device was created properly.

The first tab is the "General Setup" tab.

Let's discuss what is important here.

You will notice that the IP address and network mask is filled out. This essentially "sets" the subnet for that interface. DHCP will use this network automatically.

I found this very confusing and this is very different from how Ubiquiti and other routers establish the network for an interface.


First, there is the "Advanced" tab. I will show that here. I made no changes to this tab.

By the way....the DHCP Server section below shows up across all tabs, which in my opinion is a bit of a design flaw (why not make it its own tab?).  

There are some fields related to the DHCP server, and one might be interested in changing the default lease time or making other changes in the "advanced" field. I chose to stick with all of the defaults here.


Then there is the "Physical" tab. The first decision is to name your interface not in use.

We will go with eth0.3 which, as the GUI demonstrates, suggests that each "dot x" relates to a logical VLAN off of the L3 switch, which is named (or mapped to) eth0.

The other important decision is whether you want to add that interface to a bridge. I elected to do so, since the first default interface LAN is on a bridge (I did it for consistency).


NOTE: It is worth pointing out that you indeed can add multiple interfaces to a single bridge. But I don't suggest doing this unless you know precisely why you are doing it.

So for now, each Interface is on its own dedicated bridge. There is a 1:1 relationship between Interface and Bridge.

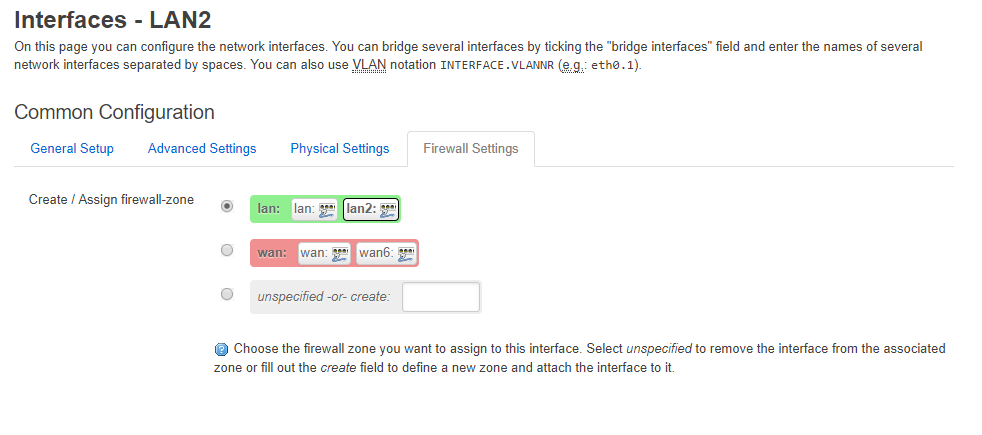
Next, there is a tab called "Firewall Settings". Let's examine that.

The OpenWRT router uses the well-known and common concept of "zones of security". By default there is a WAN zone, and a LAN zone. The WAN zone has policies and rules concerning traffic that is entering (ingress) or leaving (egress) the WAN port. The LAN zone has policies and rules for traffic that are internal to the router (between VLANs or otherwise L3-Switched Traffic).

You have the ability to define a new zone (LAN2), and put your new LAN2 interface in a LAN2 zone (and this would be a good idea of you needed special rules for this interface that differed between LAN2 and LAN). But setting up zones with rules takes time, and can be error-prone. Plus we don't have any specific reason to believe that our LAN2 interface needs anything different than the other LAN interface from a security point of view.

So we will share the same firewall zone for both the LAN and L2 interfaces. For now.

Are we done? NO. There is more work to do. Quite a bit actually.

Let's stop for a moment and review what we have done and where we are.

  1. We have created a new Interface
  2. We have named it and put it on a bridge
  3. We have put it in a firewall zone.
So why would this not be enough to put the interface into use?
Because we do not know what ports will use this interface! 

Right now, the ports are all bound to the L3 Switch, and the switch is set up to use a single VLAN which has 192.168.x.0/24 with a gateway address of 192.168.x.1 (x = 1 in a default configuration of OpenWRT).

So we now need to go into the Network / Switch menu at the very top of the administrative interface.


By default, there will only be two rows here. 
  1. VLAN ID 1 (LAN)
  2. VLAN ID 2 (WAN)
Let's discuss these two default VLANs.

VLAN ID of 1 is essentially mapped to the LAN. The smoking gun indicator of this is that ports LAN1-4 are not set to "off". They are therefore in use, but set to "untagged" (don't assume untagged means unused - a very common misconception).

VLAN ID of 2 is essentially mapped to the WAN because it has the inversion situation where the ports LAN1-4 are set to off (not in use), but the WAN port is set to "untagged" (again, in use but untagged). 

Both these ports interface with the CPU port (switch port) eth0, which can be viewed perhaps analogous to bus for traffic. The Bus tags traffic so that it knows what VLAN the traffic is coming from or going to.

We need to add a VLAN ID of 3 for our new bridged interface LAN 2 we created. And we are going to change the port assignments so that 2 ports are on the LAN, and 2 ports are on LAN2. Once this is done, each of these Interfaces can have an address space (e.g. 192.168.2.0/24 and 192.168.3.0/24).


NOTEif we wanted to, we could create 3 new interfaces and 3 new VLAN IDs so that the router could manage 4 subnets. But we don't need 4 subnets. We only need two. So we are only going to "stripe" the router with a 2 x 2 configuration (two ports subnet=A, and two ports subnet=B). And when we do that we will see this screen below.


As we can see, VLAN ID of 1 has the LAN 1 and LAN 2 ports set to "untagged", and LAN 3 and LAN 4 ports are turned (set to) off.

VLAN ID 2 has LAN 3 and LAN 4 ports set to untagged, and LAN 1 and LAN 2 ports set to off.

There are some very bad GUI design issues here on the Switch interface, and let's discuss those:

The fact that the switch uses the labels LAN 1, LAN 2, LAN 3 and LAN 4 is confusing. 
  • There is a LAN 1 interface
  • There is a LAN 2 interface we just created
There is no LAN 3 or LAN 4 interface. 

Thank goodness they have pictures of the ports here, or people could really screw this router up.

From here, we could be finished. We could plug devices into the ports and ensure you get the right IP addresses on each port (e.g. 192.168.2.x on ports 1 and 2 and 192.168.3.x on ports 3 and 4).

I will avoid a discussion on DHCP and DNS, but there is a tab at the top of the administrative interface for DHCP/DNS, and you can configure all of the typical things in a series of tabs on that menu item. 

The one thing that may be worth mentioning is the "Static Leases" section which is a fixture at the bottom of the "DHCP/DNS" page no matter what tab you happen to be working with.

On this page, you can set mac address IP reservations. And one thing I did not like about this is that it doesn't seem to prevent you from putting the wrong subnet into the reservation. So if the port is a 192.168.2.0/24 port, you can still put in a 192.168.3.0/24 IP for that mac. The GUI does not care or validate or otherwise govern the assignments. So you better know what network the port is on before you start entering reservations in the GUI. And this could be a pain if you had 4 subnets and a ton of reservations to type in here.

Okay. That is all. As we can see, this router is not as "nimble" to administer as the Ubiquiti EdgeRouterX. 


Router Hack: VPN Filter


This is a good article that explains the VPN Filter hack.

https://arstechnica.com/information-technology/2018/05/hackers-infect-500000-consumer-routers-all-over-the-world-with-malware/


Building a Cross Compilation Toolchain for MIPS32 - Part II


I spent about 3 days trying to get the cross compilation toolchain for MIPS 32 working. Maybe this wasn't enough time, but it was all of the time I had before I had to stick a knife in the effort and call it done - unsuccessfully.

Compiling the toolchain is essentially done in 3 steps:
1. Compile binutils for the target architecture
2. Compile a lightweight C compiler for the target architecture
3. Compile a standard C Library (e.g. glibc) for the target architecture using the compiler from step 2.

I could never make this work. I could usually get #1 to work. I could usually get #2 to work. I could never get #3 to work.

At this point, I went back and reverse-engineered the toolchain that OpenWRT was using for MIPS32. The CMakefiles, scripts, and generated Makefiles were extremely complex. And I saw patches being used in several places. Patches to scripts. Patches to Makefiles. Patches to header files.

At that point, I decided I didn't have the time or bandwidth to complete the project of building a cross-compilation toolchain successfully.

I decided instead to try and use the one from OpenWRT that was already built. More on that in a subsequent post.


Building a Cross Compilation Toolchain for MIPS32 - Part I

It seems there are a lot of people out there who do cross-compiling for the ARM processor (i.e. Raspberry Pi uses an ARM if I'm not mistaken).

But there aren't many people out there that have done this for a MIPS32 processor.

I noticed that when I built OpenWRT and used the make menuconfig utility to specify the target parameters, it has its own cross-compilation framework and engine in it.

To compile some ADDITIONAL software of your own, you would need to reverse-engineer (and possible recycle and reuse) this framework. Or, you could look into building your own cross-compilation platform.

I looked into the former, and then did some quick web searches to attempt the latter.

In doing the web searches, I began to learn the "methodology" for doing cross compilation in general. The steps seem more or less the same, no matter what kind of platform you are compiling for. It involves building a "toolchain". A Toolchain is essentially defined as "the tools used for cross compilation".

I found a guy who built such a toolchain for MIPS, and began the process using his site as a guide:

http://www.lara.prd.fr/users/oliviermehani/2007ie/mipsellinuxtoolchain

I like the fact that he lays out the process (or, at least, HIS process):
a) Download and Build binutils
b) Download and build gcc
c) Download and build gcc-lib

Another link I came across reaffirmed these steps, but with some additional insight and information.
http://cowlark.com/2009-07-04-building-gcc/

In this link, he explains, for example, why it is important to do your builds from a different directory than where the source is initially downloaded and extracted/spooled.
BTW...in his article he suggests building binutils from an outside directory but the first link does not do this. I was following the first set of steps from Olivier Mehani before I came across this additional link.

So What Went Wrong Initially
I was following the instructions on Oliver Mehani's site "to the letter". Which means that I decided to use the same versions of binutils, gcc and gcclib that he used in the article.

I failed to realize how old these versions were - some of which were going back to 2004 (it is now 2018).  I also failed to realize that the true target, which is OpenWRT running on a former Ubiquity EdgeRouterX device, is a MUCH MUCH newer device and Linux operating system.

In fact, the OS is now called LEDE rather than OpenWRT (OpenWRT split with LEDE and the two have just recently merged back into a single entity and they now use the term LEDE for the OS).

When I downloaded the 2.14 version of binutils, it configured and built (and installed) just fine.

Building gcc also went fine although time consuming (at least on a single or dual core Virtual Machine on VirtualBox running on a Windows 10 laptop).

When I compiled gcclib, I got an error about it being incompatible with the binutils version I was using.

At this point, I began trying some different versions of both binutils as well as the compiler. I first downloaded the most recent versions of these. And got a series of nasty errors on the compile and make processes of gcc.

Later the light bulb went off and I realized that the best practice would be to use the same versions of binutils, gcc and gcclib that were on the target device (again, OpenWRT MIPS32 image I installed on the Ubiquity EdgeRouterX device).

So the versions on that device are:
  • binutils v2.27
  • gcc v5.4.1
  • glibc v5.4.1
The closest ones I could find on the mirrors were:
  • binutils v2.27
  • gcc v5.4.0
  • glibc v5.4.0

GCC Prequisite Dependencies
When I compiled the original 2.13 of binutils and then compiled the 3.3.4 version of gcc on Olivier's page, binutils compiled fine but the gcc produced an error (a data type I believe it was).

So this led to me trying new versions and combinations/permutations of binutils and gcc trying to find a magic combination that would work (configure, make and make install).

Later more recent versions of gcc started to complain about some extraneous packages that it cold not find, telling me I could specify these libraries as compiler options:

configure: error: Building GCC requires GMP 4.2+, MPFR 2.4.0+ and MPC 0.8.0+. Try the --with-gmp, --with-mpfr and.or --with/mpc options to specify their locations.

I did not get these errors on gcc 3.3.4, so I started to get frustrated about the circuitous loop of package dependencies and considered abandoning my effort.

But - via a web search , I learned that that in version 5.4.0 of gcc, a script was packaged in the /contrib directory called "download_prerequisites" and the rather sophisticated script (I did not study it) downloads and positions these packages so that they can be built and incorporated into gcc seamlessly.

NOTE: I noticed this script was NOT included in version 4.3.3 of gcc, which I later used, but I found that I could port the script from version 5.4.0 to 4.3.3 and it appeared to work.

GCC Version
After initially trying to get 3.3.4 to work, I downloaded version 5.4.0 of the gcc compiler and after pulling down the threads and running the pre-req script to install GMP, MPFR and MPC, I tried to run the configure script which bailed with the error:
"@itemx must follow @item"

TexInfo Error on GCC Configure
Some web searches showed that the issue was the version of texinfo (I was using a recent 5.x version of it on my CentOS7 Linux VM).  I downloaded the tool rpmreaper to see if it was safe to uninstall it (it was), and installed a much earlier version of texinfo (4.13) that someone on the web suggested might be valid to use in order to avoid this error. I compiled it and installed it, and tried to run the configure script again on version 5.4.0 of gcc.

The "configure" script in gcc is a VERY long script indeed to run (>30 min) on my laptop. You cannot specify -j X with the configure script, so it is serial, much like a linking process.

Link tests are not allowed after GCC_NO_EXECUTABLES
Finally - after waiting for what seemed like the better part of an hour, the configure process on gcc 5.4.0 bailed out with the following error:
checking dynamic linker characteristics... configure: error: Link tests are not allowed after GCC_NO_EXECUTABLES.

Web searches appear inconclusive, although I do see some people complaining about this issue. Most of the people on these threads suggest that an earlier version of gcc may fix the issue.

So - we will attempt version 4.3.3 of the gcc compiler, which someone on the web suggests may work. First we will do a rm -rf on the gcc-build directory, then download this version 4.3.3 and re-run our configure script again to see if it solves this issue.

Version 4.3.3 of gcc
And off we go. Again. Actually, the configure script on this came back lickety split.

So now we will run, from our gcc-build directory, the "make -j 2" command to try and leverage two cores that we have provisioned on this virtual machine.

And off we go. Again. Waiting. Again.


Thursday, May 10, 2018

OpenWRT on a Ubiquiti EdgeRouterX - Part II

So in Part I, I built the source from scratch and generated an image that I could load onto a Ubiquiti EdgeRouterX device.

This worked - in the sense that I was able to boot that image and get a functional and working OpenWRT (LEDE) image.

The router handed me an IP address like it should have. The router was passing my packets out to the web and back, performing its SNAT functions like a good little router should.

The problems started when I tried to use the package manager.

The first problem I ran into using the package manager was the fact that the urls in the feeds.conf file were not resolving. They were all using openwrt.git.org. This may have been because the git sites for openwrt were down (temporarily). I fixed these urls by looking out on the web for the actual github urls, and commenting out the git.org sites and using the github sites instead.

Once I fixed this issue, I noticed that I kept getting an error from the opkg utility about having zero bytes in the overlay file system.

In looking, I did not have an /overlay file system. I had a directory off the root directory called /overlay.

In doing a google search on this issue I found a number of forum posts but when you clicked them, they links timed out.

Clearly, something went wrong when I built the image.

I typed the mount command, and saw a / mounted on a rootfs file system. I saw a tmpfs on /tmp. But no overlay. I didn't really understand the overlay file system anyway, so I was in trouble there. I knew enough to believe I might be able to manually mount this file system on a device, but I didn't see the device and things looked quite intimidating.

I began to realize that I was quite screwed. I had a router that I could not administratively update or manage because the file system was not "correct". I considered paper clipping (hard reset) the router, but I wasn't sure what that would do since I had replaced the original flash image from Ubiquiti with the one from OpenWRT. It seemed risky to do that.

I finally found a page that allowed me to take a more sensible risk. I found a page that had hardware / firmware images, and I decided to "upgrade" my router with the new image listed on this page. I wasn't sure if that would actually fix the file system layout on the flash or not, and I suspected it wouldn't, but I gave it a try nonetheless.

So after downloading the new flash image, I discovered another issue. This image I had built did not include the Luci GUI, so I needed to do anything and everything via command line. I found a way to upgrade the router via command line with this link:

https://openwrt.org/docs/guide-user/installation/sysupgrade.cli

Using ssh, I copied the downloaded image into a temporary directory and ran the command:
sysupgrade -v /tmp/*.bin
And - lo and behold - after rebooting, I got a new, much superior image and experience. I had the Luci GUI. The file system looked proper.


Now we have a /dev/root on /rom of type squashfs - something we did not see before.
Most importantly, we see the overlayfs mounted on the / folder in a directory called /overlay.
And some others we did not see before, either.

Things look better. We can launch a GUI and we can update our packages now. I installed OpenVPN, for example, which added itself to the "Services" menu.

Tuesday, May 8, 2018

OpenWRT on a Ubiquity EdgeRouterX - Part I

We have been using these Ubiquity EdgeRouter X devices for a while now in here (about a year). They're incredible devices; can't say enough about them.

We were curious to see if you could run OpenWRT on these.

The first thing we had to do is to get some intelligence on the device.

We could have cracked open the case and studied the circuit board, but we didn't do that. By using search engines, we were able to ascertain that it was a 32 bit MIPS processor (MIPS Technologies); MIPS32 1004K. They make a couple of renditions of these chips (i.e. MIPS321004Kc or MIPS321003Kf), the c standing for "coherent" and the f standing for "floating point".

After logging onto the device and looking in /proc/cpuinfo (issuing the command "show hardware cpu" also shows this information), we were able to ascertain that the board (system type?) is MediaTek MT6721 ver:1 eco:3. The processor was confirmed as MIPS 1004Kc V2.15.

So the next step was to figure out how to download and compile OpenWRT on this chipset. This can get hairy and complicated, depending on how much support for the chip there is out in the communities.

As it turns out, if you download OpenWRT on a Linux machine, there is some built-in cross compilation support for MIPS32 right within OpenWRT itself. Apparently the gnu compiler gcc supports the MIPS32 target architecture also, which is nice [ NOTE: validate this ].

If there wasn't, you would need to try to find a toolchain (which has compiler, linker and so forth), and [try to] build OpenWRT from scratch, and this would also include building any and all libraries that the code referenced - a potentially huge job. Just doing the Makefiles could take a week or two.

So to compile it, you need to download the OpenWRT source code (I created a directory called /opt/crosscompile and untarred to that, which creates a openwrt directory) and from the top level directory run "make config", or, in my case, I ran "make menuconfig". Running menuconfig pulls up a curses-based menu that allows you to configure your build - including the options to include in your OpenWRT and target platform specifics for a cross-compile.

Build Options
Originally when I ran this, I went to select the Target System and chose "MIPS Malta CoreLV board (qemu)". There was also an option called "MIPS pistachio". I was confused as to which was the right one. And - YOU BETTER CHOOSE THE RIGHT ONE! If you don't, you can risk bricking (ruining) the device when you try to run the code.

It turns out, that neither is the right one. The correct choice for "Target System" was further down below, called "MediaTek Ralink MIPS" (other than the Mediatek and MIPS, there wouldn't be any easy way to figure this out).

The Subtarget is MT6721, which now starts to make some sense based on the output of what showed up in /proc/cpuinfo on the Ubiquity device. But this subtarget would never have shown up as an option if you didn't get the proper Target System right to begin with.

If you select the proper Target and Subtarget, you get an option for "Ubiquity EdgeRouter X" as the Target Profile.

And finally, for "Target Image", you need to make sure that "ramdisk" is selected because this generates a "img" file that is tarred into a tarball that you will eventually boot into the Ubiquity image loader to boot the OpenWRT image you compile.

I made no changes to the Global Build Settings. Initially, I did select "Build the OpenWRT Image Builder" and "Build the OpenWRT SDK" options in the make menuconfig menu listing, but I had to back these out because the compile was spewing out warnings about library dependencies.

Libraries
Running the build without fully reading the README is almost always a mistake, and it bit me here as well. There is a script called "feeds" that will update and install the dependent libraries. This needs to be run.

This script failed when I ran it, and this COULD be because OpenWRT had an issue with their Github site that day (the mirrors).

I went on the web and did some checking, and the packages I needed in the build seemed to be on https://github.com/XXXXX as opposed to https://openwrt.git.org which is what the scripts were all primed with. So what I did was to fix these urls one at a time, and iteratively kick off the build until it launched with no dependent library warnings.

Build
After the build completed (which took a while - about 2 hours - in a 2 core VirtualBox virtual machine running CentOS7 Linux), I had to figure out where the resultant images were written. They are actually written to the /openwrt/bin/targets folder. The full path is:

/opt/crosscompile/openwrt/bin/targets/ramips/mt7621/openwrt-ramips-mt7621-ubnt-erx-initramfs-factory.tar.

There is also a bin file in this directory as well, but it is the tar you need to load into the device.

Transfer
The next step is secure copy (scp) the tar file into a temporary directory on the Ubiquity EdgeRouterX device. We elected to put it into /tmp.

Then - once copied over, you can log into the UbiquityEdgeRouterX via ssh or through the web console, and go into the temporary directory and type:
"add system image openwrt-ramips-mt7621-ubnt-erx-initramfs-factory.tar"

If this add system command worked you should get a confirmation (i.e. image added). It will place the image on a list of images stored on the device, and mark that image as bootable (apparently it works much like a LIFO queue, where the last image added is the bootable one).

It is now time to reboot the device, by typing "reboot". This is the moment of truth.

But...there is an important step!

Change Ethernet Cable to eth1 on the device!!!!
On the Ubiquity device, eth0 is the management interface, and eth1 is actually the WAN link (eth2-4 are local links).

On OpenWRT, it uses eth0 as a WAN link, and eth1 is the management link.

If you attempt to reboot the device and your cable is [ still ] plugged into the wrong NIC, you will not be able to log in and access the device under OpenWRT.

So switching the cable from eth0 to eth1 is the next step...


Image Re-load
If there any major issues with the image I think adding the image would have flagged that. But the real proof is when you reboot the device.

In our case, the image booted with a "OpenWRT" ASCII MOTD banner, letting you know it booted.

Explore

From here, you can dance around the OpenWRT file systems to your hearts content, as this review stops here.

The only thing I will mention is that I did install the graphical menu for OpenWRT, called Luci.


I will log into that web interface to see what it looks like as I explore OpenWRT.

SLAs using Zabbix in a VMware Environment

 Zabbix 7 introduced some better support for SLAs. It also had better support for VMware. VMware, of course now owned by BroadSoft, has prio...