Showing posts with label security. Show all posts
Showing posts with label security. Show all posts
Saturday, April 25, 2020
Configuring Persistent Bans with Fail2Ban
Someone gave me a network to put a Virtual Machine on, and I thought that network was a NAT. It wasn't. I was extremely lucky the VM did not get hacked. I immediately shut down the public facing interface, and installed FirewallD, allowing only key authentication through ssh.
That is NOT enough. In examining logs, this VM was getting pounded on all day, every day.
So, I took an extra measure of installing Fail2Ban. Initially, I configured a 24 hour jail time. But after seeing the same IPs come after the VM time and time again, I decided to reconfigure for a permanent ban.
To configure a permanent ban, I used -1 on the ban time (which in old days was in seconds, but they now accept the "365d", "52w", "1y" formats.
Now from there, things get more interesting. Wanting to get this configured quickly, I took the measures explained in this blog post for configuring Persistent Bans on Fail2Ban.
Configuring Persistent Bans with Fail2Ban
First, let's discuss what he assumes. He assumes, that you are configuring your jail to use iptables-multiport actions. Indeed, I have read (in another blog) that using the iptables-multiport actions might be a bit safer than using firewalld-multiport rules, even though you might be running FirewallD!
So that is exactly what I did. My jail.local file has a default ban of 52w. My ssh-specific rules use a -1 value on ban time (permanent ban), and use the iptables-multiport action rules.
I backed up this iptables-multiport file, and added a line on "action start" to loop through all of the hosts (ip addresses) in the /etc/fail2ban/persistent.bans file, and block them (refer to blog link above for specific rule). Then, on action ban, a simple print statement will echo the action of a permanent ban to a log file, so that we can see incrementally, who is banned.
Now later, I did check out the firewallcmd-multiport file, which would essentially attempt the same things that iptables-multiport does, except with firewall-cmd statements instead.
To do that, I would do the same thing. I would back up the firewallcmd-multiport file, and make the following changes.
1. The action to ban an IP is: firewall-cmd --direct --add-rule <family> filter f2b-<name> 0 -s <ip> -j <blocktype>
So I would take this, and add in the actionstart section, a loop rule that looks like this:
cat /etc/fail2ban/persistent.bans | awk '/^fail2ban-<name>/ {print $2}' | while read IP; do \
firewall-cmd --direct --add-rule <family> filter f2b-<name> 0 -s <ip> -j <blocktype>; done
2. Then, I would add in the actionban section, the same print statement that resides in the iptables-multiport.conf file so that as new bands are added, they get logged:
echo "fail2ban-<name> <ip>" >> /etc/fail2ban/persistent.bans
Of course, a restart of fail2ban needs to be made for these to kick in, and this needs to be verified before you walk away after the change!
The only thing that has me wondering now, is that as the list of banned ips grows, your rules will grow, and this could have performance impacts on packet processing. But protecting your box is imperative, and should be the first priority! You could, if your list grows too long, periodically release some prisoners from jail, I suppose. And see if they behave, or perhaps maybe move on to better things.
Tuesday, May 28, 2019
Palo Alto Firewall VM Series - Integration and Evaluation - Part III
Okay, this is just a short post to discuss where we are in the integration process.
- I have a Python script that generates XML. In this script, you pass in parameters, and then I use the ETree library in Python to generate the XML.
- I have some bash scripts that take the XML files, and invoke the Python XML API Wrapper, which in turn does the legwork to send the data to the API Server on the Firewall.
Normally one might create the Management Profile, Zones and Security Policies first. And THEN add or assign interfaces, routers, routes on those routers, etc.
This is the basic process I am following thus far:
- Create Management Profile
- Load Interface(s) - the management profile in #1 is included.
- Create Zone(s)
- Create Security Policies - the interfaces included
- Assign interface to default router
- Load Static Route on default router - include interface
Seems to be working okay although the process needs to be tightened up a bit so that you are not using one Python program to generate the xml, and another to call the API.
But it's good enough to load and test and see if I can get a firewall operational.
Friday, May 17, 2019
Palo Alto Firewall VM Series - Integration and Evaluation - Part II
After a couple of days of playing around with the Palo Alto VM-Series Firewall (running the VM on a KVM / LibvirtD virtualization platform on a CentOS7 host), I felt I was comfortable enough with it to explore the API.
I asked a Palo Alto engineer how they bootstrap these things. He told me they use CloudInit and use a boot.xml file to change the default password. From there, they use their management platform, Panorama, to push configurations to the devices.
I don't happen to have Panorama anywhere. And I presume like everything else, it needs licenses. So, I started looking at the facilities to interface/integrate with the device; meaning APIs.
There are actually several APIs:
- Command Line Interface (CLI)
- WildFire API
- AutoFocus API
- PAN-OS Licensing API
- Panorama XML API (requires Panorama of course)
- Pan-OS XML API
I located, downloaded and glanced through the XML API Guide. Which actually does do a nice job of getting you acquainted with the API. There is nothing really unusual. You need to authenticate, get a token (they call it a key), and with that key you can go to work (I won't cover details of the API here).
Next it was time to examine the API firsthand. Is it running? Do I need a license? I used Postman for this. I don't know if there are other better tools for picking at APIs, but I think Postman is definitely one of those most popular tools. Making add/modify changes is always risky when you are learning a new API, so it always makes sense to start with some "get" calls so you can understand the structure of the data. So, I was able to hit the VM on standard SSL port 443, and get back a key, and with the key, run a few get commands based on examples in the API Guide. The API works, it appears!
One noteworthy comment is that the API would not work without turning off certificate validation in the settings!
Next, I considered starting to write some Python code as a client, but as Palo Alto is a pretty popular firewall from a large company, there had to be some folks who have broken ground on that already, right? A quick google search for a Python API client turned up a project from a guy named Kevin Steves, who has clients for ALL of the APIs in Python. It is on GitHub with a free use license.
https://github.com/PaloAltoNetworks/pandevice/
After cloning this, I noticed you can run setup. I elected not to run setup, and just try to invoke the API directly. I had to use the panxapi.py python file. Examining the source code, you can supply an exhaustive list of options to the main() module of the Python file, which will parse those and invoke accordingly.
Immediately, however, I ran into the same certificate validation error I experienced with PostMan. But in PostMan I could just go into settings and disable certificate validation. Figuring out how to do this with the API was more difficult. Eventually, I found an issue recorded on the project that discusses this same problem, which can be found at this link: Certificate Validation Issue
The issue discusses versions of Python on CentOS that do certificate checking. Rather than fool with upgrading Python, one poster pointed out that you can, in fact, disable certificate checking in Python by setting an environment variable: "export PYTHONHTTPSVERIFY=0". Bingo. That's all I need right now to experiment with the API.
Tuesday, May 14, 2019
Palo Alto Firewall VM Series - Integration and Evaluation - Part I
This week, I am evaluating the Palo Alto VM-Series Firewall.
I will ramble a bit about what I am doing, learning, etc.
First off, this VM-Series Firewall can run as a qcow2 image on KVM, it can load as an OVF onto the VMWare vSphere ESXi platform, and I have seen some evidence of people loading it on VirtualBox also. I am using it on a KVM (libvirtd) host.
The main thing about a virtual firewall appliance is how it plumbs into the virtual networking, using virtual adaptors, or host NICs.
One the VM I just installed, I set up 4 Adaptors.
If we assume 4 NICs on the virtual machine, the very first NIC is designated as the management NIC. What is confusing about this, is that you might expect this NIC to show up in the list of interfaces. It doesn't. You have to "know" that the first NIC is a management NIC that does NOT show up in the list of Interfaces.
If we look at the screenshot below, you will see a Management IP Address on a 172.22.0.0/24 network. This is shown on the "Dashboard" tab of the Palo Alto user interface.
Yet, if we look at the list of Interfaces (Network tab), we will see that this Management Interface (first NIC in the KVM list of adaptors) does not exist.

I would have to go back and see how well this is documented, for I admittedly dive in without reading documentation sometimes. But it was NOT very intuitive. I would prefer for the interfaces to "line up" with the VM adaptors, and if one is a Management Interface, perhaps it is greyed out, or managed in a unique way.
I understand why Palo Alto did this, for the Management Interface is generally considered a unique pipe into the product - used for administration of the device itself and generally is not considered part of a traffic plane interface. But it did make it difficult at first for me because I did not know which bridge the first Interface was indeed connected to - the br0 (which has a 172.22.0.0/24 network on it), or br1 (which has a 172.21.0.0/24 network on it).
Palo Alto, like FirewallD, is a zone-based firewall. So while you may have a tendency to get fixated on your Interfaces (trying to get them to light up green) initially, the first thing you really SHOULD do is a bit of forethought and planning, and create your Zones.
I created two zones (currently):
I will ramble a bit about what I am doing, learning, etc.
First off, this VM-Series Firewall can run as a qcow2 image on KVM, it can load as an OVF onto the VMWare vSphere ESXi platform, and I have seen some evidence of people loading it on VirtualBox also. I am using it on a KVM (libvirtd) host.
The main thing about a virtual firewall appliance is how it plumbs into the virtual networking, using virtual adaptors, or host NICs.
One the VM I just installed, I set up 4 Adaptors.
 |
| 4 NICs on the Palo Alto VM |
If we look at the screenshot below, you will see a Management IP Address on a 172.22.0.0/24 network. This is shown on the "Dashboard" tab of the Palo Alto user interface.
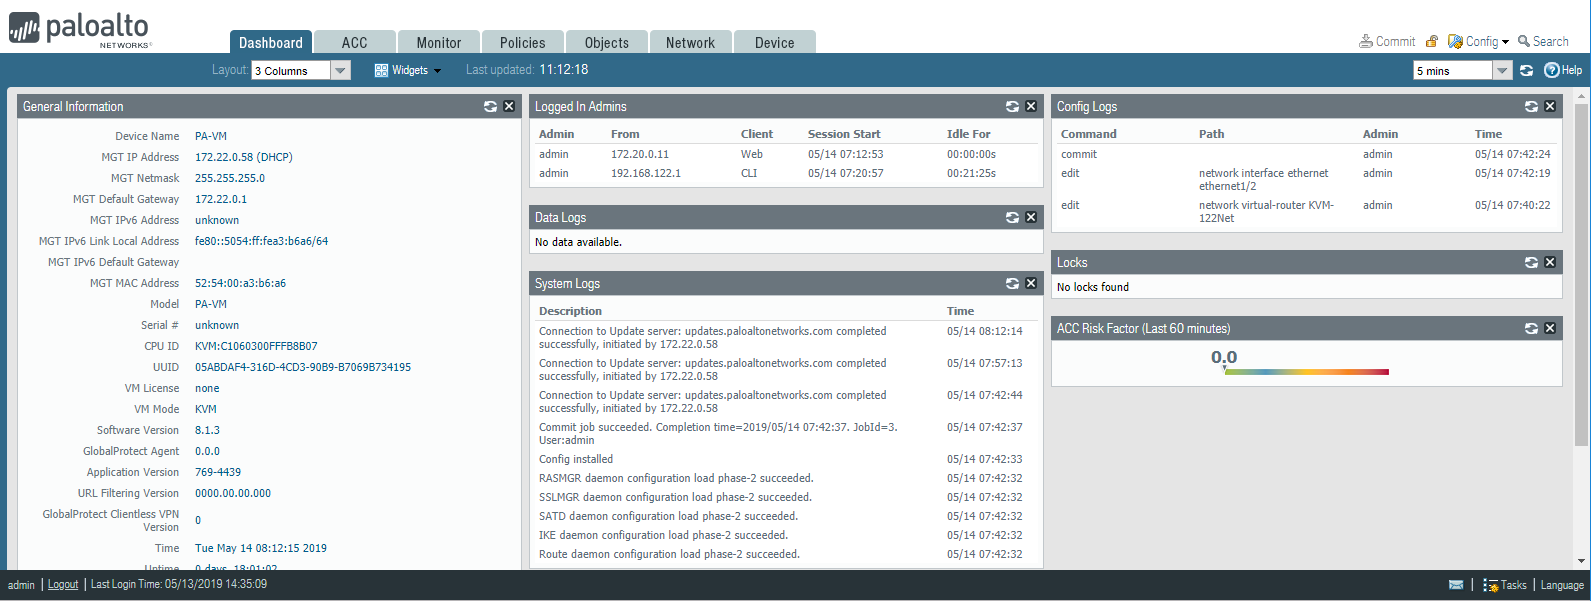 |
| The Management Interface connects to a VM NIC that does not show up in the list of Interfaces |
Yet, if we look at the list of Interfaces (Network tab), we will see that this Management Interface (first NIC in the KVM list of adaptors) does not exist.

I would have to go back and see how well this is documented, for I admittedly dive in without reading documentation sometimes. But it was NOT very intuitive. I would prefer for the interfaces to "line up" with the VM adaptors, and if one is a Management Interface, perhaps it is greyed out, or managed in a unique way.
I understand why Palo Alto did this, for the Management Interface is generally considered a unique pipe into the product - used for administration of the device itself and generally is not considered part of a traffic plane interface. But it did make it difficult at first for me because I did not know which bridge the first Interface was indeed connected to - the br0 (which has a 172.22.0.0/24 network on it), or br1 (which has a 172.21.0.0/24 network on it).
Palo Alto, like FirewallD, is a zone-based firewall. So while you may have a tendency to get fixated on your Interfaces (trying to get them to light up green) initially, the first thing you really SHOULD do is a bit of forethought and planning, and create your Zones.
I created two zones (currently):
- Trusted L3
- UnTrusted L3
 |
| Two Zones Initially Created - L3 Trusted, and L3 Untrusted |
The Untrusted Zone contains the interface Ethernet1/1, which is connected to a host adaptor via a bridge. For this reason I considered this interface to be untrusted, as per my thinking, it would connect up to my Router much like a Firewall at the edge of a premise might connect to an ISP.
The Trusted Zone contains two interfaces Ethernet1/2 and Ethernet1/3.
Ethernet1/2 is mapped to an adaptor on the virtual machine that is connected to the "default" KVM network, which has CIDR of 192.168.122.0/24. But - this is a NAT network! Packets that leave the KVM host are Source NAT'ed. How this works with the Firewall? I don't know yet - I have not tested extensively with this "type" of network.
Ethernet1/3 is mapped to an adaptor on the virtual machine that is connected to an Internal KVM network which has a CIDR of 192.168.124.0/24. This network, though is NOT a NAT network. It is a Routed Network. A Routed Network is routed between KVM Internal networks, but generally is not reachable outside the KVM host, because KVM creates iptables rules that drop inbound packets coming from any host aside of the KVM host itself (I tested this - pings from another host cannot reach the 192.168.122.0/24 network because they get dropped on a FORWARD chain rule). I suppose theoretically, if you hacked the iptables rules properly on the KVM host, these KVM internal networks could be reachable. Maybe there is a facility for this designed to accommodate strange circumventions like these, but messing with the iptables rules, and especially the order of such rules, are prone to issues.
So in summary, it does appear that the Palo Alto Firewall VM-Series, on KVM, will work with KVM Internal networks in a respectful way. You would just want to classify these as "Trusted" networks when it comes to zones and security policies.
Tuesday, July 3, 2018
Introduction to SCAP for Hardening Linux Systems
This could be a long post...I could write a book about this based on what I have been doing recently.
Let's start with the concept of "System Hardening" on Linux.
Most people are familiar with SELinux (SE = System Enforcing, I believe). The NSA came up with this originally, and it is now part of mainstream Linux distributions (Centos, Ubuntu, RHEL, et al). It is centered around policy files that are written and loaded, and these essentially govern what an application is allowed to do, and not to do.
Above and beyond this, some additional frameworks such as SCAP have been established.
https://en.wikipedia.org/wiki/Security_Content_Automation_Protocol
The open source implementation of this protocol is OpenSCAP
https://www.open-scap.org/
So what is this protocol about, SCAP? These are markup-language driven policies that bring a system into a compliance level for security and hardening.
There are two primary packages you need to run this:
1. scap-security-guide
2. scap-workbench
The first package does install some dependency packages, so it is best to use yum or a repository-based install method, or you will be installing a bunch of rpms in succession. The scap-security-guide is the package that "drives" the interpretation of policies, authoring, compilation or customization of existing policies, etc.
The second package is a graphical front-end of the scap-security-guide package. Everything you can do with the GUI can be done on command line, but the GUI does add some value.
For instance:
- You get some nice graphical graphs of compliancy percentages.
- You get a listing of policy rules and descriptions
- You can run or test policies in various manners (Dry Run, Full Mode)
With this stated, let's say that you have 100 Linux systems, and you have a policy. For instance, let's say the policy is for a CentOS7 Minimal Install system and that policy has 211 rules.
Let's assume that a baseline CentOS7 system is 80% compliant to these rules out of the box after installation, but that you, as an administrator, bring it up to 90% compliancy with some post-installation steps.
Then, as you deploy this baseline image onto 200 servers, you check it periodically to find that the compliancy level keeps dropping due to system administrators installing packages or whatever.
You can run a "Remediate" feature in SCAP that can 'pull' those systems back into Compliancy per the baseline. The Remediate feature allows for bash, Ansible or Puppet scripts to be run.
NOTE: In my initial testing, using bash, this did not work. But I have not played with it much.
In order to run the baselines, it is best to install these scap packages FIRST on your systems, and take your initial baseline. Then, periodically after additional changes to the system, you can run it again and compare the results to the baseline.
Okay - this is my first introduction on this topic.
Subscribe to:
Posts (Atom)