Friday, October 20, 2023

Artificial Intelligence Book 1 - Using Images in AI - Deep Convolutional Q Learning

I just finished Chapter 12 in my AI Crash Course book, from Hadelin de Ponteves.

Chapter 12 is a short chapter actually. It explains, in a refreshing and surprising simple way, the concept of Convolutional Q Learning which pertains to how image recognition/translation is fed into a Deep Q Neural Network (from prior chapters in the book).

The chapter covers four steps:

  1. Convolution - applying feature detectors to an image
  2. Max Pooling - simplifying the data
  3. Flattening - taking all of the results of #1 and #2 and putting them into a one-dimensional array
  4. Full Connection - feeding the one-dimensional array as Inputs into the Deep Q Learning model

I probably don't need to go over all of these details in this blog as that would be redundant. 

If you have some exposure to Computing and are familiar with Bitmaps, I think this process has shares some conceptual similarity to Bitmaps. 

For example, in Step 1 - Convolution - you are essentially sliding a feature detector or "filter" (e.g. 3x3 in the book) over an image - starting on Row 1, and sliding it left to right one one column at a time before dropping down to Row 2 and repeating that process. On each slide interval, you are employing a mapping process of multiplying each square of the image (again using a 3z3 area in the book) to the corresponding value of the map. Each individual iteration of this process creates a single Feature Map

In sliding this 3x3 map across, you can only go 5 times to the right before you run out of real estate. Then you drop down - and you can only drop down 5 times until you run out of real estate in that direction. So if I am correct in my interpretation about how this works, you would get 5 x 5 = 25 Feature Maps with a 7x7 image and a 3x3 filter.

Pooling is actually similar to the process of filtering to a feature map. The aim of it is to reduce the size and complexity of all of those feature maps. The sliding process is the main difference; instead of going one column / row on each slide, you are sliding (using a 2x2 in the book) over the entire area of the pool size.

Once you get all of the pools, these are flattened out into a single dimensional array, and fed into the Inputs of the standard Q Learning model, with the outputs pertaining to image recognition.

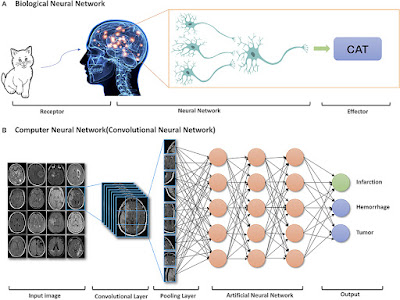
This diagram shows how all of this is done, with a nice comparison between Biological image recognition, with this AI image recognition process.


Image Recognition - Biological vs AI

Source: frontiersin.org

Now in Chapter 12 of the book, the process represents what we see above. There is just a single Convolutional Layer and Pooling Layer before the AI Neural Network (hidden layers) are engaged. 

Chapter 12 does not cover the fact that the Convolutional Layer is an iterative process that includes Convolution followed by Sub-Sampling in an iterative fashion. 

This diagram below represents this.


In the next chapter, there is a code sample, so I will be able to see whether it includes this sub-sampling process or not.

Deep Q Learning - Neural Networks - Training the Model Takes Resources

I now am starting to see why those companies with deep pockets have an unfair advantage in the not-so-level playing field of adopting AI.  Resources.  

It takes a LOT of energy and computing resources to train these Artificial Intelligence models.

In Chapter 11 of AI Crash Course (by Hadelin de Ponteves), I did the work. I downloaded, inspected, and ran the examples, which are based on Google's Deep Mind project. The idea is to use an AI to control server temperature, and compare this with an "internal" (no AI) temperature manager.

What you would do, is to train the model (first), and it would produce a model.h5 file, that would then be used when you ran the actual model through testing. 

The problem, though, is that on my rather powerful Mac Pro laptop, the training would never run. I would return HOURS later, only to see [ killed ] on the command prompt. The OS apparently was running out of resources (memory probably).

So I started tinkering with the code.

First, I reduced the number of epochs (from 25 to 10). 

#number_epochs = 25  

number_epochs = 10

Which looked like it helped, but ultimately didn't work.

Then, I reduced the number of times the training loops would run. When I looked at the original code, the number of iterations was enormous.

# STARTING THE LOOP OVER ALL THE TIMESTEPS (1 Timestep = 1 Minute) IN ONE EPOCH

while ((not game_over) and timestep <= 5 * 30 * 24 * 60):

This is 216,000 loop iterations in the inner loop, and of course this needs to be considered from the context of the outer loop (25, or, adjusted down to 10 as I did).  So 216,000 * 25 = 5 million, 400 thousand. If we reduce to 10 the number of Epochs, we are dealing with 2 million, 600 thousand.

I don't know how much memory (Heap) is used over that many iterations but on a consumer machine, you are probably going to tax it pretty hard (remember it has to run the OS and whatever tasks happen to be running on it).

I was FINALLY able to get this to run by reducing the number of Epochs to 10, and reducing the steps to 5 * 30 * 24 (3600). And even with this drastic reduction, you could see the benefits the AI performed over the non-AI temperature control mechanism.

Thursday, October 5, 2023

Artificial Intelligence Book 1 - Crash Course in AI - Deep Q Learning

 I read about Q Learning, and was feeling somewhat proud of myself for sticking my toe into the water.

Then I read about Deep Q Learning - in this same book - and it was as if someone took an ice bath and dumped it over my head. I went into the tunnel - advancing through chapters 9,10 and 11, only to come out the other end confused ("what did I just read?").  

The coding examples were interesting enough that I kept pushing forward, but a lot of what is in the code is masked by the fact that the math and formulas were hidden away in libraries like Keras.  So while I thought the examples were cool and I had a grasp of the problems they were attempting to solve, I still came out at the end with confusion and question marks in my head.

Q Learning vs Deep Q Learning

 In Chapter 9, which covers Deep Q-Learning, things start to get very complex very fast. So what is the difference between Q Learning (introduced in Chapter 7-8), and Deep Q Learning?

  • More complex problems in Deep Q Learning - with more variables
  • The approach to solving a more complex problem

With regards to the approach to solving problems, the book gets into a good discussion - worth mentioning here - about the difference between ArgMax and SoftMax.

Argmax vs Softmax

In Q Learning, the 'name of the game' was to find (and use) the highest Q Value. This is referred to as "Exploitive" and is known as the ArgMax method of Reinforcement Learning.  

In Deep Q Learning, probability distributions across several variables are being continually updated during the training of the model. You have a set of (input) variables, with specific weights, but as you take random samples and compare the predicated value to the actual value, the weights are updated according to the new realities (results).  This process is referred to as Explorative (in nature) and is named the SoftMax method.

Chapter 9 starts you off simple(r). With a Real Estate example of predicting home prices. Seems sensible enough, since we can all think of input variables that help drive the price of a home.  The focus here is on trying to show the process, which is broken down into the following steps:

  1. Uploading the Data Set (actual home prices)
  2. Building the Neural Network
  3. Training the Neural Network
  4. Displaying the Results

From here, the book advances into Deep Learning Theory. The idea borrows from the human brain, which is connected by Synapses that send signals. This is the fundamental concept behind Deep Q Learning because it starts with a certain number of "Layers". There are a minimum of three layers that are as follows:

  1. Input Layer - consists of Input Values, and each of these gets weights that are continually adjusted
  2. Hidden Layer(s) - these "neurons" are also continually adjusted
  3. Output Layer - this layer compares predicted values to actual values and computes Loss Error.

The loss error gets back-propagated through the layers, re-adjusting the weights continually, using a concept called Gradient Descent (which requires at least a basic understanding of Calculus). The book covers three types of Gradient Descent (Batch, Stochastic and Mini-Batch).

The book mentions Activation Functions that take weighted input values, and return an output value. The book mentions three of these, which sound intimidating, but if you are familiar with Electronics and/or Trigonometry, these names actually make some sense:

  • Sigmoid Activation Function - a logarithmic curve denoting a move from state value (no lower than) 0 to (no higher than) 1.
  • Rectifier Activation Function - a linear but angular approach from state 0 to state 1
  • Threshold Activation Function - An abrupt binary state transition from 0 to 1. This is much like flipping a switch into an on/off state.

Now from here (Chapter 9), the book goes into Chapter 10 - Self Driving Car - which an implementation of Chapter 9 - and quite fun to do. Then it dives into Chapter 11, which uses the example taken from Google's DeepMind project that optimizes server temperature with a simulation.

Chapter 11 in particular really drives home the process by showing how you can optimize or minimize costs.

  1. Building the Environment
  2. Building the Brain - using DropOut vs NoDropOut techniques
  3. Implementation (of the Deep Learning Algorithm)
  4. Training the AI - using either Early Stopping or No Early Stopping
  5. Testing the AI

Seeing is believing, and when you see this code run and start to view the results, I have to admit it is pretty darn cool.

It also takes a LONG time to run. I had to shorten the epochs from 100 to 25 to keep the job from getting killed (I am not sure what exactly was killing it). Running for 100 epochs was taking my laptop HOURS to finish (2-3 hours). But at the end of each Epoch, almost always the energy savings from the AI was superior to the energy savings of not using the AI (which in this case is modeled by the server's mainboard temperature controller).

There's so much more to discuss. But I think I have hit the highlights here.

Tuesday, October 3, 2023

Examining My Blog Analytics

This Blog - I never really "truly" cared about who saw it. I think the blog has served more as a personal diary for me than a blog that I wrote for purposes of harvesting subscribers and attention.

I have a friend who is creating a "business" (I will withhold my comments about things like Business Model). Maybe it's a hobby he thinks is a business. At any rate,  he was asking me questions as he was creating his website, and this did make me realize that I know little to nothing about crawlers, indexing, search engines, and how to maximize search engine results. I surprised myself with this realization. 

I mean, I have a working knowledge and understanding about things like Cookies, Meta Tags, and stuff like this. But it isn't something I am fluent with.

This blog gets a few peeks here and there, and a few have made some comments that I have helped them with certain issues they were looking for answers for. But really, traffic on this blog is drop in the ocean - and a small drop at that.

Today, I pulled up Analytics, and noticed that 2/3 of the pages on this blog were not indexed. There were about 3 reasons listed: 

  • Alternate Page with Proper Canonical Tag (WTF is this???)
  • Mobile Usability
  • No Sitemap

I made some changes to it:
    •    Added a SiteMap
    •    Changed the Theme to accommodate Mobile Pages
    •    Resubmitted the Blog for Indexing - including individual pages with the Canonical error

Now here is something quite interesting.
    •    I put a search string in DuckDuckGo, and up comes this blog lickety split - right at the top.
    •    Same search string in Bing.com and my blog came up lickety split - right at the top.

Note: The search string I used was "Techgrasper Blogspot"

But - when I put the same search string into Google, there was literally NO MENTION of my blog. At all. Zero. 

And this blog is hosted on a Google-owned platform!!! So what is going on there???

  • Is this blog on a blacklist or being censored?
  • Is this blog suppressed because I am not paying Google, or generating ads on it?
  • Some other reason Google is not showing the blog?
This sure does open the can of worms when it comes to the control of information flow, and who sees what. Clearly when different search engines show THIS LEVEL of inconsistency, we have some major major major major issues.

Ironically enough from a timing perspective, my whole desire to check my blog in search results is happening at the same time that Google is defending itself from a Sherman Act lawsuit.

Look - if this is a blog, called techgrasper, and there aren't many things out on the world wide web that have the words blog + techgrasper in them, shouldn't this blog SHOW UP???? On the prevailing dominant search engine???? Hosted on a blogging platform that THEY OWN????

Why I Am Not an Expert in User Interfaces and Web Front-Ends

Quite some years ago, I worked at a cool startup company towards the tail of the Dot Com bubble. I won't mention it here I guess. But - they were pioneers in Mobile Apps. 

They promised this "write once run anywhere" concept, where you would write your app in a proprietary markup language, and they would parse this markup and render the content on a host of early devices. The field for competing devices in these days was insane, including stuff like Palm Pilots to VERY early mobile phone browsers that ran their own simplistic markup (phones in those days had no resources to the markups had to be dumbed down and simplified).

Anyway, we split the development up into "tiers" where we had "front end" developers who were super knowledgeable in how to render content, and then we had the "back end" developers who wrote the server logic (really it was 3 Tier, so business logic and database logic). Most of the stuff was written in Java, and these guys had licensed WebLogic application servers, and were using EJBs (which were a hot technology at the time). They even used Entity Beans, which practically nobody used (most shops had gone with a stateless architecture and used Session Beans). WebLogic was cool, admittedly, and introduced me to Connection Pools for databases, Threads, etc. These concepts are widely used today. 

As cool as WebLogic was, it was not my first exposure to an Application Server. I was the first one in a large Telco company to bring in an Application Server (I worked in an Innovation Center back then). I contracted in for a Time Keeping system from a Silicon Valley company (Tock I think it was called), which we customized, and this system was architected for Netscape Application Server - which I believe was indeed the first "application server". Feel free to comment if anyone has a correction to this belief.

Anyway, I digress. But these technologies, if they didn't outright invent it, they lent themselves well to the concept of 3 Tier application design as we know it today. Which allowed your web front ends to be developed in a compartmentalized fashion.

I never really worked much on GUIs and Web Front Ends. I did a little bit "here and there". Websphere pages (later on). The Java Spring framework. I created a website for a small consulting company we owned back at one point. But aside of brief stints with user interfaces, the focus was never really web front-ends.

I am realizing that I need to "bone up" a bit. My next post will explain why.

Monday, October 2, 2023

Service Now Integration using pysnow API client for Python

My latest technology initiative, has been doing some first-hand integration to Service Now, using the Service Now API.  The first thing I did, was to load the API calls into PostMan. Once I tested the OAuth 2.0 authentication, and made a couple of test calls, I was ready to proceed with Python.

I searched for a Service Now Python Client, and sure enough, there is one. It is called "pysnow" and it can be installed with the Python pip utility:

>pip install pysnow

Once installed, you can interact with Service Now in a very straightforward manner - although there are some client-specific things one should learn from reading the documentation. Authentication uses OAuth 2.0, and the token re-generation is done as part of the API client, which is convenient. 

Once you have authenticated, you generally bind to a resource first (i.e. a Table), and once you have bound to it, you can then make a call against that resource (i.e. a query).  Data from calls can be accessed using helper functions such as first() or first_or_none().

Here is a snippet (from their documentation) on how the client is used:

import pysnow 
# Create client object
c = pysnow.Client(instance='myinstance', user='myusername', password='mypassword')

# Define a resource, here we'll use the incident table API
incident = c.resource(api_path='/table/incident')

# Query for incidents with state 3
response = incident.get(query={'state': 3})

# Print out the first match, or `None`
print(response.first_or_none())

Service Now, in my mind, is just a huge relational database full of tables. And the API calls are allowing you to retrieve from these tables (GET calls), update these tables (PUT calls), or delete from these tables (DELETE calls). 

You can pass queries as arguments on the GET calls, and the queries are very similar to those you might use with SQL, supporting things such as wildcard with LIKE clauses, etc.

There was one case, where I had to abandon the pysnow client, and use Python Requests. It was a case where one of the API calls required a PATCH call. I had never actually even heard of a PATCH call before encountering this, but it's a valid call - just one that is a bit more rare to encounter and up to now, I had not seen it. The pysnow API did not support a PATCH request, interestingly enough, and after figuring this out, I had to (re) write the API client calls using Python Requests for the PATCH API call.

Aside of this, the only other surprise I had, was the number of fields I was getting back on many of these calls. Some of these records were incredibly large.

SLAs using Zabbix in a VMware Environment

 Zabbix 7 introduced some better support for SLAs. It also had better support for VMware. VMware, of course now owned by BroadSoft, has prio...